Designing Kitchen Cabinets: Part 1
Unwritten Rules from the Architect
If you are a homeowner looking to design a kitchen whether it is remodeling or making a custom design, this series will walk you through basic insider knowledge about selecting and designing kitchen cabinets. Kitchen cabinets are usually the first thing that is seen when walking into a kitchen. They set the functionality, style and mood of the kitchen. And now that every house is designed with an open concept, they are more important than ever. So before you head over to your a design professional take some time to read through these tips.
Guidelines to Follow When Laying Out Your Cabinets:
Cabinet Sizes
It is best to plan the cabinets in 3” increments, between 9”-42” wide for wall and base cabinets, and between 12”-36” tall for wall cabinets. There are two exceptions for wall cabinet height – most stock cabinet manufacturers and some semi-custom cabinet manufacturers do not make 21” and 27″ tall wall cabinets. Tall or pantry cabinets have a lot of variety in the industry so to keep it simple for now, use either 84” or 90” tall and 15, 18 or 24” wide. These are the most common sizes for tall cabinets so the majority of manufacturers will be able to provide these sizes. Semi- and custom cabinet manufacturers make a variety of tall cabinet heights and widths, and you can stack cabinets to get a interesting variety as well.
Sink base cabinets (with an open top) are usually more limited in sizes. Stick to 30” or 36” wide for sink bases. If you are planning on having a small secondary sink, an extra large sink, or a special sink (like an apron sink) you will likely have to use a semi-custom or custom cabinet manufacturer to accommodate a sink base cabinet that will work with the sink.
As you can see, from this catalog list of base cabinets from three styles of Hampton Bay stock cabinetry, the Full Door base cabinets (full height door, no drawer) in the Designer series come in many widths. However, the Standard and Unfinished series only come in 9” wide, and sink bases only have two or three sizes.
Cabinet Alignment
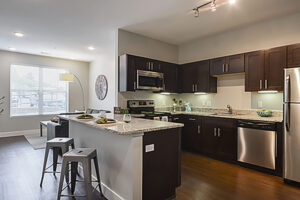
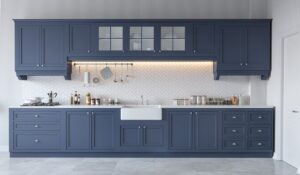
There is no rule that says that you have to line up cabinets vertically (the same width cabinet above and below) unless you prefer that style. The white kitchen shown below has aligned wall and base cabinets, which works with the design theme set by the stacked pattern of the tile backsplash. However, in the blue kitchen the wall cabinets in the middle do not align vertically with the base cabinets. Both are aesthetically pleasing, it just depends on your style.
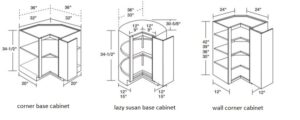
Cabinet Corners
A great way to handle corners is with specialty corner cabinets like “lazy-susans”. Symmetrical corner base cabinets like lazy susans are either 33” or 36” wide on a side. Upper corner cabinets are typically either 24” or 27” on a side. There is a special corner cabinet called a “blind” cabinet that extends past the adjacent cabinet to fill up that corner space. Usually these are not included in stock cabinet catalogs, but are common in semi- and custom cabinet lines and are a little easier to design around.
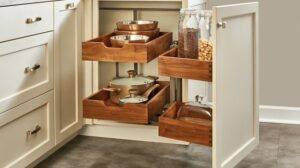
It can be tricky to get specialty corner cabinets to work well with your particular kitchen layout. You always have the option of placing a couple fillers between the cabinets and continue laying out the cabinets from the corner outward.When you know where your corner cabinets will be and the approach you will take with them, your cabinet supplier can offer some alternatives for storage. Some companies have some very clever solutions. Here is an example of a base cabinet insert from rev-a-shelf, designed to fit in a base blind cabinet
Ground Rules to Avoid Common Design Mistakes:
Corner Conflicts
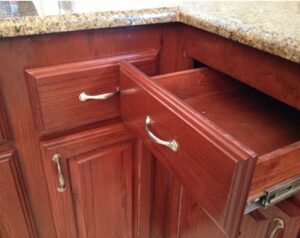
Consider your corner drawers and cabinet doors and their proximity to deep appliances. Drawers in a 24” deep cabinet extend about 21” past the face of the cabinet when fully extended. Make sure the drawer or door can open all the way without hitting the adjacent refrigerator, stove or dishwasher handle. This is most easily achieved by moving the appliance away from the corner, and knowing your appliance dimensions and clearances. Dishwashers and ranges are very standardized in dimensions, 24” and 30” wide respectively.
Ranges also come in 36” widths or larger for serious cooking enthusiasts. But refrigerators vary widely. If you plan on 36” wide, with 1” clearances at the sides, and 36” deep, you will account for most refrigerators. The image shows a 35” deep refrigerator blocking a corner cabinet door from opening easily. In this situation the owner will eventually get used to how to open this door, but will probably end up with a scratched refrigerator.
Appliances and Clearances
Know your appliance clearances and try not to put appliances adjacent to walls. Refrigerator and microwave doors will not open fully if too close to a wall that extends past the appliance. Dishwasher doors may run into door frames or window sills. Ranges may have side clearances to protect adjacent objects from excessive heat or in the case of gas ranges need side clearances at the cooking surface around 6” wide for proper combustion.
NKBA guidelines recommend the following work spaces or landing areas adjacent to appliances and fixtures:
- Landing areas can overlap
- A landing area at least 15” wide adjacent to or above an oven. This landing area could be across from the oven if the opposite countertop is not more than 48″ away and if the appliance does not open into a walkway.
- At least 15” of landing area above, below or adjacent to the handle side of a microwave
- A minimum of 12 inches of landing area on one side of a cooking surface and 15 inches on the other side
- At least 15 inches of landing area on the handle side of the refrigerator, either side of a side-by-side refrigerator, or no more than 48 inches across from the front of the refrigerator
- Include a section of continuous countertop at least 30 inches wide by 24 inches deep immediately next to a sink for a primary preparation/work area, and 18” on the other side. If you have two sinks, i.e. one dedicated to cleanup, the spaces should be 24” on one side and 18” on the other side of the cleanup sink.
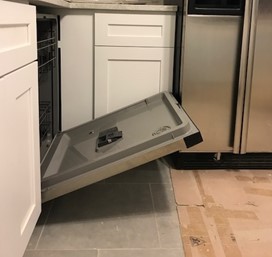
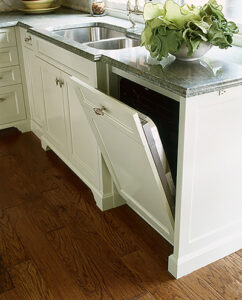
- The dishwasher should be no further than 36” from the main cleanup sink, and if it’s in a corner, leave 21” between the dishwasher and the corner so you can stand there to unload the machine, so any adjacent drawer will not hit the dishwasher door or handle, and so the dishwasher door does not hit adjacent pulls or large appliances. (see image above)
Fillers Are Your Friend
Don’t be tempted to fill up every available inch of space with cabinetry. Trust me on this one, I can do a whole post just on fillers. But I want to keep this an overview so I will simplify. Fillers typically come in 3” and 6” widths for the following purposes (including but not limited to):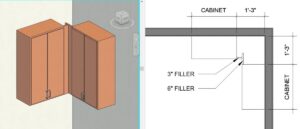
- Cut lengthwise to fill in a gap width that may not be known until the cabinets are set in place. Plan on using at least one filler in a straight run of cabinets between immovable obstacles, like two walls. This gives the installer some breathing room to compensate for walls that are crooked or not plumb. If you
 have an old house with plaster walls – your walls
 - are probably not plumb (perfectly vertical). Plaster sags when being applied and the wall is probably thicker at the bottom than at the top. Cabinets are pretty much perfectly square, so fillers help bridge the potentially irregular gap between cabinet and wall.
- Use fillers to set a cabinet away from the wall so there is room for the knob or pull when doors are open 90 degrees, and to ensure drawers don’t hit a potentially crooked wall or adjacent door jamb. Try to make this filler between 1 ½” and 3”. This is particularly important if you are planning on having roll-out trays inside base cabinets as the door must be able to open 90 degrees or greater for the roll-out to function.
 Plan on using a filler in a 90 degree corner where you are not using a special corner cabinet. This is for the same reason as at a side wall – you want enough room for the doors to open 90 degrees with a pull or knob installed, and to prevent the drawer from hitting the adjacent knob or pull.
- Don’t use fillers next to microwave/hoods or range hoods, unless you are planning on filling the resulting gap with something that can be easily cleaned (like another filler). Or unless you like the idea of grease building up over time inside the gap.
- Gaps at walls of ¼” or less can just be caulked, you don’t have to use fillers for something that small. With that said, it is hard to cut a filler ½” wide, so try to plan any filler to be no less than 1”. This is something to discuss with your installer.
Don’t Forget Panels
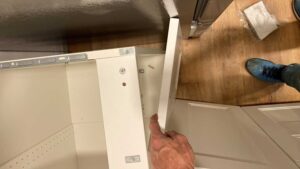
Dishwashers are not designed to hold up your countertop. So if a dishwasher is at the end of a run, or adjacent to an appliance, you will need to account for at least a ¾” wide panel for the purpose of covering up the side of the dishwasher, and to hold up the countertop. Some companies make these panels with a filler already attached, that can be cut in the field, if needed. These panels can usually be finished on the interior so they can be used to create desks and wheelchair accessible work areas too.
Some corner lazy-Susan cabinets are barrel shaped, or don’t extend all the way back to the wall. They would therefore need a panel on the side, if they are to be installed next to an appliance (which is really not recommended but in tight u-shaped kitchens is often done with the range) to close off the space behind them and help hold up the countertop. In this case a 3/4″ wide panel will do.
There are also tall panels to use next to refrigerators to give a more built-in look, and to help hold up 24” deep wall cabinets installed over refrigerators. Just as with the base cabinets, 3/4″ wide is minimum, although often 1 1/2″ or even 3″ can look a bit more substantial. So leave room for these kinds of panels.
But wait…. There’s more!
To learn more about the design layout and cabinet styles take a look at Part Two of the Designing Kitchen Cabinets Series. In addition, to discover current trends for kitchens such as modern pulls and brushed finishes just click here to read our Hot Trends in Apartments blog.