 Long ago, when I started my career, a contractor asked me if he could use a concrete saw to “cut all of the tendon tails at once” on his new post-tension slab on grade. That is to say — he was hoping to cut all of the tendon tails flush with the edge of slab, then grout the stressing pockets and . . . bury the evidence. Needless to say, the answer was “no” — with a bit of embroidery to make sure we understood each other.
It’s understandable — everybody wants to save time — but tendon finishing is easily one of the most important steps to ensure the durability of a post-tension slab. In the anecdote above, the issue is that the chances of getting adequate cover (and thus, corrosion protection) over the anchor was non-existent. The super-high-strength steel used in post-tension tendons (4 1/2 times stronger than typical rebar) is very vulnerable to corrosion, and any corrosion which does occur radically reduces the tendon’s capacity. Added to this, one of the most important parts of the post-tension tendon — the anchor — is right there, which means that any corrosion that does occur occurs at the worst possible location.
In order to ensure proper tendon finishing, EVstudio’s most basic general notes state the following:
- Protruding tendons shall be burned off approximately 1″ from face of anchorage, and at least 1/2″ inside slab face.
- Wedge pockets should be filled with non-metallic non-shrink grout within 7 days of final stressing operation.
- Prior to grouting, all tendon ends should be covered with rust-inhibiting mastic coating.
That said, what are the various ways to finish tendons? In my experience, there are four ways to take care of this:
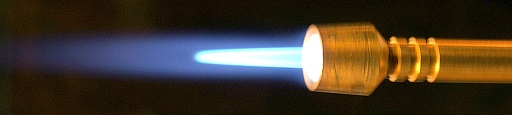
- Oxyacetylene Torch. Probably the original method for finishing tendons, oxyacetylene cutting torches are still very popular on post-tension job sites across America. The pros of this method are that the equipment is common and portable, and the individual tendons go very quickly. The con is that you’re cutting the tendon with a torch — even the steadiest hand will leave a blobby cut, and “enough heat to cut metal” honestly isn’t good for the anchor or the wedges . . . if flame touches them. Many engineers no longer allow this method for exactly this reason.
- Abrasive Cutting Wheel. While I’m not a fan of running a saw down the side of the slab, it is possible to cut a tendon well inside the pocket with an angle grinder. The pro is, once again, the equipment is common and portable. The con is that, without prior planning, it can be impossible to finish the tendon within specification. It’s very difficult to get a standard angle grinder inside a 2″ circular pocket.
- Hydraulic Shear. Commonly specified by engineers who do not want to risk overheating the wedges, hydraulic shears are designed to cut the tendon off smoothly inside the stressing pocket. The pros of this method are consistent, clean cuts. The con is that the blades used in the shear are very much a consumable part — in my experience, several sets of blades are required to complete a reasonably-sized job . . . and running out of blades means that construction stalls while new ones arrive.
- Plasma Cutter. The plasma cutter is the modern descendant of the oxyacetylene torch. Instead of burning acetylene to get the heat required to cut metal, plasma cutters use an electric arc to ionize gas (including plain air, though pure nitrogen is generally used) — raising it to an incredible 30,000°F! The pro of this method is speed — lopping of stressing tails goes very quickly, compared to most other methods. The cut is still “hot”, like a torch, so practice is required to get a good tendon finish, but because of the physics of the arc (which requires a current path through the material being cut) it’s difficult to accidentally burn into the wedges. The cons are that plasma cutters are expensive (your tendon supplier may have one available for rent), and the best speeds are achieved through the use of specialty pocket formers, which are more expensive, and require planning ahead.
Basic tendon finishing is always covered in the general notes of a post-tension project. More complex projects will commonly also have a specification book with a chapter devoted to post-tension materials and design which should explicitly state which methods are allowable.