Designing Kitchen Cabinets: Part 2
Previously discussed in part one of Designing Kitchen Cabinets, we went through little tips and tricks from the expert designers to keep in mind when you are beginning your kitchen design layout. Now we are going to go one step further and talk about incorporating work triangles in your kitchen layout and take a look at some of the most common kitchen layouts.
Kitchen Layouts
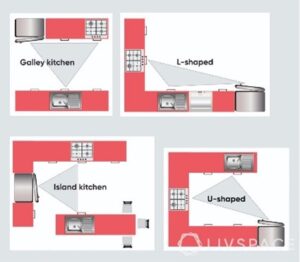
Common kitchen layouts include Pullman (or, one-wall), Galley, L-Shaped, Island and U-Shaped. Kitchens typically have three working areas including storage, prep/cleaning, and cooking. These workstations form a triangle as shown in the diagram to the right. When designing your kitchen, it’s important to keep these stations in mind, to be efficient (minimize steps) and prevent workflow obstacles.
There are some basic strategies that should be considered when incorporating your work triangle into your kitchen design. The legs of the work triangle should be no longer than 9′, no less than 4′, and the sum of the three legs should not be more than 26′. Elements of the kitchen, an island for example, should not protrude into the triangle more than 12”. Avoid full height, full depth obstacles like wall oven cabinets between primary workstations. Also try to avoid major traffic patterns or seating areas crossing the work triangle.
For more on the triangle click this link to an article by Livspace
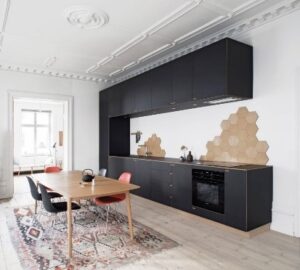
Pullman (One-Wall)
Notice that the work triangle diagram above does not display a Pullman layout as there really is not a triangle here. When working with a Pullman style it is best to not spread the stations too far apart. Storage and infrequently used appliances migrate to the ends and your prep/cleaning and cooking should be in the middle to prevent from having to walk to all ends of the kitchen. Often these layouts are supplemented by a table to provide more prep space.
Advantages of one wall kitchens are that they are great space savers and are easy to build, with no complicated corners to have to manage. They tend to be open to the rest of the house and have a modern, spacious feel. Disadvantages are that they often have limited counter space, and two cooks can find themselves in each other’s way.
Galley
This is a kitchen that has two sides with a walkway down the middle. The sides do not have to be full height. A one-wall kitchen with an island or opposing peninsula functions as a galley.
Provide a minimum of 3 feet clear distance between the opposing sides, measured to countertop edges and the faces of appliances. A common mistake is to provide 36” clear from edge of countertop to edge of countertop but not allow for a 36” deep refrigerator, which would pinch that space down to 24”. Best practice is to start with 4 feet between countertops which allows room for large appliances and keeps the travel distances short in the workspace. From there, you can adjust as needed for available space and individual needs.
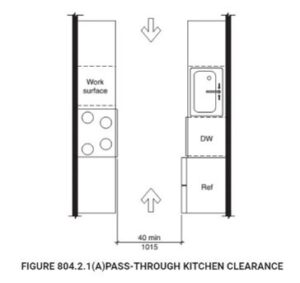
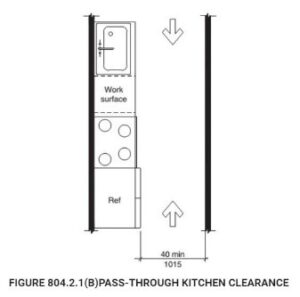
When accessibility is required by code (i.e. multifamily residential buildings) there are two types of galley kitchens defined in ICC ANSI 117.1 that have different requirements (see image below). As you can see in the images below, a Pass-Through Kitchen is defined as a kitchen with both ends open. The minimum clearance between all opposing base cabinets, countertops, appliances or walls within the kitchen work areas is 40”. This measurement is taken from the face of the appliances not the wall. For example, the illustration below measures from the face of the refrigerator door to the face of the range door opposite. This is why you need to know the dimensions of your appliances before you start laying out the kitchen. When in doubt, allow 37” depth for a refrigerator, 27” for a freestanding range and 24” for a dishwasher, measured from the wall behind the appliance to the face of it’s door.
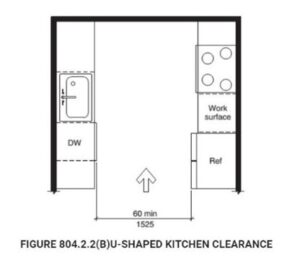
If the kitchen has two sides but is not open on both ends it’s considered a U-shaped kitchen, see figure 804.2.2 (B) under U-shaped Kitchens, below.
Advantages of galley layouts are that they are fairly efficient space savers when they are narrow, yet can provide plenty of work space and workstations for two cooks. Being enclosed between two countertops the kitchen space is clearly defined from other areas of the living space, and if one side is an island can still feel open and spacious.
Being narrow is both a pro and con. It can be a problem if there is traffic through the kitchen, and at minimum size might be too tight for two cooks. Also storage might be a problem if one side is an island. Pantries can be a nice addition to help with limited storage.
L-Shaped
Advantages of L-shaped kitchens are that they are a nice blend of galley and one wall kitchens. They are open and flexible with work stations close together. A possible disadvantage is how the corner is treated, in very small L-shaped kitchens that valuable storage space can be hard to get to and corner cabinets are trickier to install and more expensive than straight cabinets.
U-Shaped
Popular in the current trend of open concept floor plans, the U-shaped kitchen is a very efficient layout as it has three sides, one for each work station. However you want to carefully consider what is happening at the base of the “U” and make sure there is enough room for a work station placed there.
The base of the U is NOT a good place for the refrigerator as it acts as an obstruction between the sink and range, and often sticks out so far as to block easy access to the corners. This can be a problem with the range too, however, it is not as obstructive to workflow as a fridge would be.
When a sink occupies the base of the U, consider how the dishwasher is placed – you need room for the appliance and the sink base. If not adjacent to each other, keep in mind the space occupied by the open dishwasher door and make sure it doesn’t block the sink.


See also Designing Kitchen Cabinets, Part 1 for tips regarding corners.
If accessibility is required by code then the clearance between the opposing countertops must be 5’ to provide adequate turning space for a mobility device.
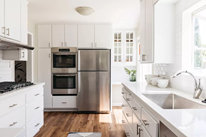
The layout of the white kitchen above is an example of the exception on the right in figure 804.2.2(C). It’s a sort of broken U, that has a way out at the base of the U. This allows the 40″ clear as a wheel chair can pass though the kitchen, rather than having to turn around within it. Although it appears there is 5’ between the counters, it could have been 40”. Again, this is only required if the kitchen has to be accessible.
Advantages of U-shaped kitchens are that they are very efficient and have plenty of work space, even when one “wall” is an island. They are great for multiple cooks. They can solve a unique problem in very large open concept plans in that they very clearly define the kitchen area, which helps bring a more comfortable scale to potentially overwhelming spaces.
Disadvantages include the two corners that you have to deal with and potential conflicts the corners can cause with appliances. U-shaped kitchens take a lot of space and are therefore not ideal for very small houses or apartments.
Island
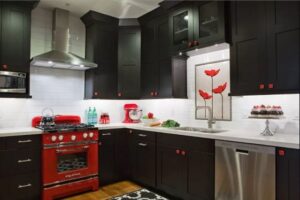
Any kitchen can have an island (like figure 804.2.2 (C) above), but it is often considered its own type because of the special challenges inherent to islands. Things to consider are where to locate outlets in the island itself, how to get power and water to the island if appliances or sinks are to be located there, how to navigate traffic around the island – especially if it includes a seating area as shown in the image at left. Also consider, if a cooktop is going to be installed in an island it will need an island hood and extra space around the cooktop for safety. There are specialty cabinets that open from both sides for use in islands and peninsulas and they are fun, but cost more than standard cabinets.
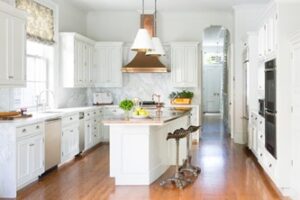
Note in the kitchen at left there is a secondary sink in the island. Secondary sinks and appliances are often added to large kitchens to create a secondary prep triangle for a second cook, to help keep the island from becoming an obstruction, or to alleviate long travel distances to work stations. In this particular kitchen the secondary sink is a food prep sink positioned on the far end of the island, creating a convenient triangle with the cooktop and refrigerator. Cleanup is handled at the larger sink.
Advantages of including an island in your kitchen are the openness and versatility it can offer. The island can be a place to bring other activities to a kitchen and can be a great place to gather. Disadvantages really revolve around it’s isolation from power and water. Or you might be the kind of person that wants your kitchen hidden away and really value those walls!
Next up: Now you have the basic layout and some tips on what to choose, next we will talk about work station and appliance “landing areas” – what are they and how big should they be?