You’ve done it again: Cruised through schematic designs with the client praising your designs and asking you to work on future projects together. Now it’s design development, the client is still happy, and the project is moving along at a breakneck pace. It’s a successful project so far; even the project manager hasn’t slept in days. You get to construction documents (CDs) and begin putting together the documentation that will win your firm their next award and realized you’ve made a big mistake.
The CDs you sent out have the wrong dimensions.
Most firms would be ruined by a mistake like this, but not yours. What saved you?
The value of good dimensioning.
Picasso, Michelangelo, Van Gogh, and [insert your name here] are all masters of their craft. Painters and sculptors use dimensions only in their minds while understanding size and proportion are critical to composition. In the world of architecture (a fundamental of which is the art of drafting), the same principles apply. Placing dimensions properly helps to bring order to a particular view of the architecture.
While many opinions on dimensions have been shared and proven objectively wrong, a common consensus for most standards has been loosely formed. Every firm can have adaptations of the guidelines below, of course (although they aren’t needed, because these are fantastic). You’re clearly here after someone told you to Google the correct way of dimensioning, but that’s okay. This is a safe space, it’s okay to admit mistakes here. So, take some notes, read over these guidelines, and enjoy.
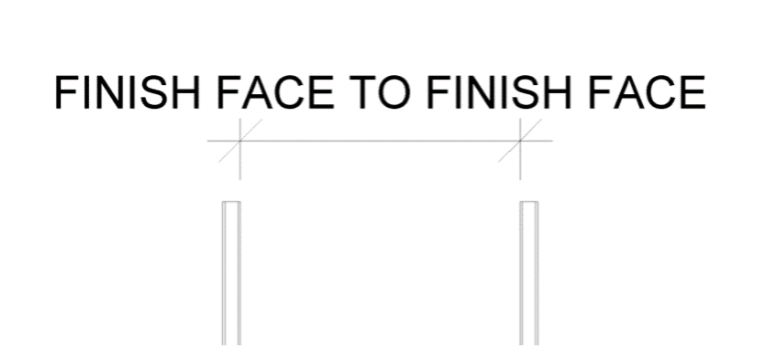
Finish Face to Finish Face
Our first tip is when to use finish face to finish face dimension strings. Most times during construction we will not use the finish face as an anchor point unless the interior dimension is specifically requested. The finished face of a material is the exposed face, or the side that you look at. In the example below, we are dimensioning to the exposed face of the sheetrock. Otherwise, we risk giving the contractor the wrong information to build off. Sometimes with different materials and stud sizes this way of dimensioning can confuse the contractor as items may not line up.
Plans that may require face to face dimensions include:
- Real Estate Plans
- Marketing Plans
- Interior Design Plans
- Specifically interior architectural plans (more common for demised spaces within a large building)
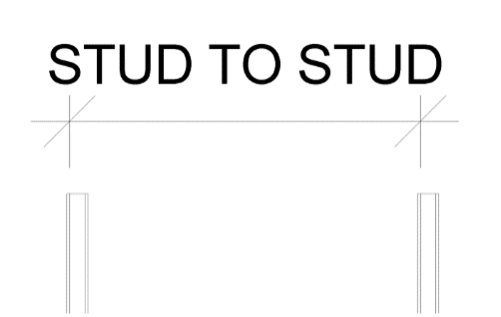
Stud-to-Stud
Every other phase of construction and plan will use some variation of stud-to-stud dimensioning. This can get complicated, especially when considering just how many things must be dimensioned on a plan at a given time. Let’s break down where it’s acceptable to dimension from. Otherwise, you can explain to the project manager (who still clearly hasn’t slept in days) why the drawings are just wrong.
Generally, the first step is to dimension on the same side of the studs each time and this is established as a standard firm-wide. In the example below, we dimensioned from the west side of the stud to the west side of the other stud so that framers know the exact distance between studs. Using this method gives the framer and contractor one dimension to worry about between studs. This also removes any calculations to remove finish materials and other gaps from the dimensions making them clearer.
The same principle also applies to north-south dimensions. As long as you follow this simple rule, most people will understand your clearances and be able to build your (soon-to-be) award-winning designs.
Demised Spaces
Now that we have a basic understanding, let’s discuss demised spaces within a larger overall building. Smarter people than I (whose existence was nearly inconceivable even to me, I know) have refined this process over centuries of construction and design.
The optimal way to dimension multiple spaces (or units) is to use the mid-point of shared walls for dimensions. This simplifies the contractor and framers ability to follow your designs and lay out the walls without mistakes. If the walls line up on the centerline, then the finishes and structure can be laid out far easier than worrying about leaving enough room between finish faces.

Always keep your plans sharp!
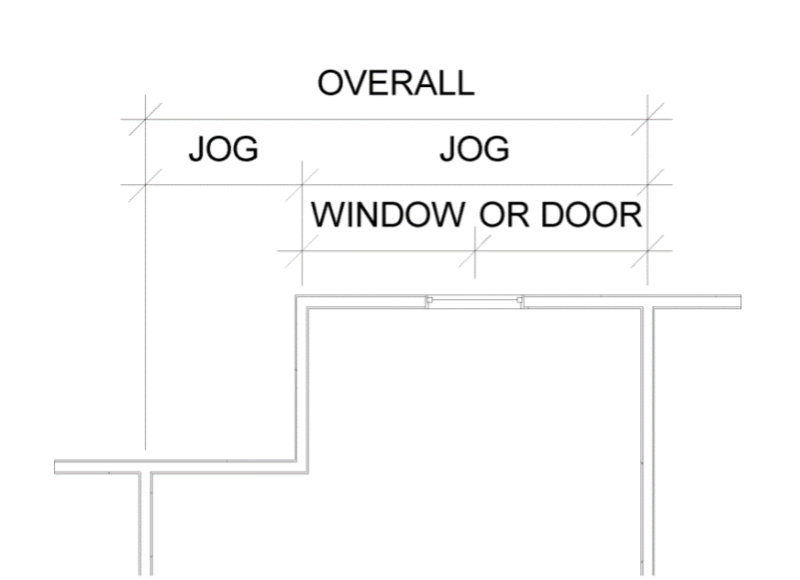
Be proud of this weird art form that you have chosen to spend life perfecting. In terms of organizing dimensions, try and keep the overalls above the individual dimensions referencing small details. Keeping plans looking sharp is easiest for me when I follow this order of operations:
- Overalls
- Major building jogs / conditions
- Windows / doors
There is so much more information that we still need to cover that you don’t want to leave yet, right? Below are some additional notes that we have run across, so keep the popcorn coming.
Quality Control Tips
- Keep interior dimensions that do not reference exterior walls to the inside of plans and exterior dimensions on the exterior of the plans.
- Try not to have graphics overlap dimensions and vice versa. Composition is important and so is readability. Be proud of a well-designed set.
- Always dimension windows or doors in wood walls to the midpoint of each item.
- If a window or door is located within a masonry wall, instead dimension to the rough opening. This may seem like superfluous information, but masonry walls are not forgiving of dimension errors. Once they are erected, they are a lot tougher to modify afterward (“extremely stubborn” defines both the masonry block and the contractor).
- A good opening dimension will be slightly larger than the object being accommodated (using whole numbers, not fractions, and hopefully on the masonry module) so that shims or dimension lumber infill can be used to tighten up the construction.
- Dimension half height walls and countertop supports. They are walls too and deserve to be seen! These often get forgotten.
- Do not duplicate dimensions. It always adds confusion, and the contractor will always ask for clarification. Just save that RFI and don’t do more work.
- Don’t use fractions! Modeling programs are extremely accurate. As you design, the model gets more and more complex. You shift it around and before you know it, your amazing, beautiful full dimensions are now fractions (the horror)! If you, like me, already hate math (and that’s why you became an architect instead of an engineer), then rest assured that most contractors also hate math. Take pity on everyone involved and don’t include 1/256, 1/128, 1/64, 1/32, 1/16, 1/8, or even ¼ in most of your dimensions. The contractors tape measure does not have them (we checked).
[Author’s note: These are painstaking notes entrusted to us to avoid making the same mistakes twice. Thanks to our R&D department’s grumpiest member for assisting with compiling this list. You know who you are.]
Now that you are more informed, you’re capable of going out there on your own and designing – and dimensioning – to your best potential. Just make sure to follow these guides when dimensioning. It will help your Project Manager finally get some sleep at night, and hopefully you’ll keep your QAQC / R&D team happy.