To the beginner or novice, Autodesk Revit sometimes has a way of having unintentional consequences. Because many of the features of Revit are smart in the sense that they automatically coordinate different portions of the project within the sheet set which take much of the brain damage away from what is a very important aspect of having a well coordinated set of construction documents, they have to be viewed or perceived in a way that respects this coordinated aspect.
I am by no means an expert but have come to know some of it’s ins and outs. This post explains one such unintended consequence that has plagued me several times in the past until I figured out it’s subtle nature. The problem with the unintentional consequence aspect is that often times you don’t realize there’s a change or difference in something until some time after the fact; after you have gone through several steps of design or documentation and you would rather not utilize the undo tool. If it takes longer to redo the recent stuff rather than readjust the unintended consequence, that is the threshold of the undo tool in this regard.
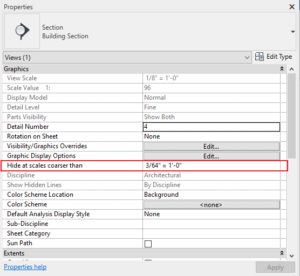
With respect to creating exterior elevation views of a building, for example, it is done in a floor plan view and by default Revit creates a view port for which the elevation is captured and the view port exists in plan view as well. I have found that it is best to think of the view port existing in all three dimensions simultaneously. That is to say, it is adjustable in plan view to define the depth to which you want to see the elements in the model by dragging the double arrow grip and in elevation view it is adjustable in height and width by dragging the filled blue dot at the center of each of the four perimeter lines of the view port when clicked on. Furthermore, the view port and depth clipping can be toggled on or off in plan and elevation views independently in the properties menu of the respective views.
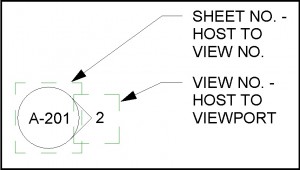
Now, say I am well into the design of a particular project, having defined the size of the view port, again three-dimensionally, in elevation and plan views. And let’s say that on my floor plan, due to some annotation or dimension string getting in the way of my elevation tag, I want to move the tag. It is simple enough to move the tag certainly however it all depends on which part of the tag you move so that the view port does not go with it. The elevation tag, because it is smart, breaks down into three basic parts or elements. There’s the bubble or box, being sort of the anchor, that contains the sheet number of where the view lives in the sheet set and then there’s pointed part of the tag which hosts both the number of the elevation of where it lives on it’s sheet and also the virtual element of the three dimensional view port itself. This is the subtle unintentional consequence aspect. If I grab the whole tag and move it, it also moves the view port. This is the subtle nature that can wreak havoc if you are unaware of it when later viewing the elevation and finding that masking regions or part of the building is no longer in view. To move just the tag and not the view port, the method I use is to pick or grab the sheet number element of the tag and move it, which will bring with it the view number but not the view port. This concept applies to interior elevations as well. I hope that helps, happy elevating!


3 thoughts on “Revit Tip #8 – Moving Elevation Tag Without Moving Associated Viewport”
Frank,
Kacy is correct. The dumb tags just don’t work that way.
More specifically, the only work around is to make a referencing elevation tag that you can place and move to a new location. Hide the original elevation tag in the view you created the reference tag as necessary. Typically the whole reason why I need to move the original tag is because its outside of a scope box/ crop area… and show isn’t showing up in plan. In those cases, I don’t have to hide the original tag because it’s already out of view.
Hi Frank, thanks for your inquiry. I too share the same experience of not being able to locate the elevation tag different from one view compared to another. I am not aware of a way to change this, as the elevation tags, unlike other tags are not view specific in that sense. I would enjoy knowing if you find a way around this though! Best of luck!!
I understand the workings of the above procedure. Sometimes the elevation bubble appears on more than one level views and you want to move the buble independently in one view but leave it in its original location in the other view/views, without changing the extents of what you see in elevation. When I move the elevation tag in one view, it moves in all the other views in which it occurs. Is there a way to move the bubble tag location in one view independently of the others?
Comments are closed.