We just recently completed another SIPs design for a single family home in Colorado. Along the way, we came across some very useful information on how to value design the home so that we were able to achieve the best cost on the SIPs package. While you can design just about anything with SIPs, it is not always cost effective. It is important to note that every manufacturer will have their own guidelines specific to their product, so it is important that your architect know this before they lock in key design parameters. With that said, many of these guidelines apply to all SIPs.
Below are some tips from our friends at Insulated Component Structures:
- Standard panel thicknesses are 4-1/2″ (r-28) & 6-1/2″ (r-42). You must use these thicknesses while designing the building or risk problems with the plans.
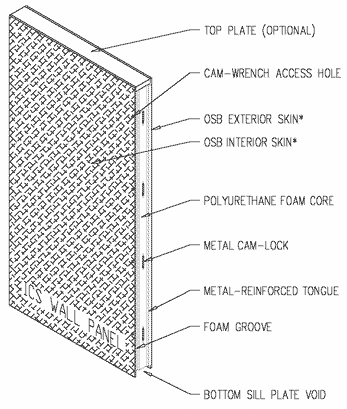
- Panel skins must sit on a solid, structural surface. They cannot hang, unsupported, outside the foundation wall. Sips are designed with a 1-1/2” void in the bottom to fit over a 2x sill-plate. Sips must not touch concrete that touches earth. Use a pressure-treated sill-plate (ripped to the panel width) on concrete, and a regular sill-plate centered on it.
- Sips are made with a 1-1/2” void at the top for acceptance of a field-installed continuous top-plate. Top-plate joints must not be within 12” of a panel joint.
- Raked (or gabled-end) panels and panels with beveled tops are more expensive and more difficult to produce. Designs where the panels are rectangular are least-cost.
- If panel heights are designed around standard osb lengths, there is less waste and labor costs for cutting. Standard osb sizes are 8’0”, 9’0”, 10’0”, 12’0”, 16’0” and 24’1”.
- Panel widths can be any size up to 48”. Panels that are exactly 48” are easiest to produce and most efficient to ship and install. This will also reduce waste.
- One-piece corners solve several problems with thermal envelopes. Ideally, one-piece corners should be 24” on each leg’s minor dimension. Consequently, the major dimension would be 24” plus the panel thickness (4.5” or 6.5”). This is true for both “inside” and “outside” corners.
- Ideally, door and window openings should be not less than 3′-0″ from the out side of a corner.
- A door or window with a rough-opening width of 36″ or less can be placed within one panel. This is preferable to doors and windows that span two or more panels. Ideally, windows should be minumum 12” apart.
- Ideally, structures should be designed so that no panels are taller than 16′-0″. It is possible to make taller panels (up to 24’0”), but it is not as practical.
- Whenever possible, headers should be placed in the rim or truss space with joist or trusses hanging from them.
- Roof panels should have support beneath the panels, not within the panels. Lumber or tjis in panels cause thermal-bridges. Roof panels should have no wood embedded in them and all panel joints should be foam-to-foam. Typically, 8’ spans for 6.5”-thick roof panels are appropriate for the front-range of Colorado. At 8’ spans, they can handle a total load of 75 psf.
- For least-cost, eaves should be square at the ends and let the trimming take care of making them plumb.
- Consider sips ceilings attached to the bottom chord of roof trusses rather than a fully sips roof. This will eliminate the extra expense of foam over the pitch and eaves.
- Electrical boxes and conduits should be placed within the sip panels at the factory. Remember to indicate all devices that will need conduit or boxes, i.e. Electrical outlets, switches, speakers, doorbells, smoke-detectors, telephones, internet or lan devices, alarm systems, etc.
- Conduits can run from up, down, or side-to-side, or any combination. Generally, the ideal situation is for the electrical wiring and connections to be within the floor system and/or in the attic. Consequently, a sip wall panel should sit on a floor system so the conduit can run vertically down from the box in the panel to the bottom of the panel. Wiring can then be routed through the sill plate and through the floor joists across to the next conduit. Conduits can run up to an upper-level floor system or attic.
- Sips skins can be many materials, including osb, fiber-cement, dry-wall, aluminum, galvanized or stainless-steel, fiber-reinforced plastic laminate (frpl), t-111 siding, t&g pine, etc. However, for structural applications, the skins must be structural. Osb, t-111, and t&g pine tend to be structural, while the other options are not nearly as structural, if at all.
Please note that the above parameters are ideal guidelines for this manufacturer and can adjusted to meet your needs. By following these ideal design parameters, you can reduce the cost of panels, and save manufacturing and installation time.


