Revit Architecture has a fairly robust system for placing and designing walls. The first important step in the process is selecting the type of wall that needs to be placed. A bunch of typical wall types are included ‘out of the box’. For instance, I have included a screen shot of ‘Interior – 4.5″ Parition’ as an example. This wall type is a typical residential interior wall.
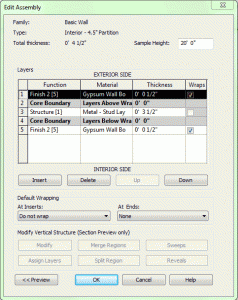
This dialog clearly shows that the wall is a basic wall and is constructed with a 2×4 stud with 1/2″ of gypsum board on each side. One very important feature is that the assembly shows two layers (2 and 4) which are core boundaries. The core refers to the central, load bearing portion of the wall. We only ever put one layer in there be it wood studs, cmu etc. That makes it a lot easier when it comes to placing the wall in the plan.
When placing a wall we are presented, in a somewhat hidden fashion, with a number of options. First of all, Revit assumes the bottom of the wall is on the current level. In our case Main Floor. It also assumes the upper portion of the wall is unconnected to a height of 20′-0″. Typically I like to select how high the wall extends. So on a residential project, if I am drawing an interior wall on the Main Floor I will have it extend to the Upper Floor. That keeps it out of my Upper Floor plan.
The next option is the location line of the wall. This is an imaginary line that Revit uses place the wall. For this there are six options:
- Wall centerline
- Core centerline
- Finish face: Exterior
- Finish face: Interior
- Core face: Exterior
- Core face: Interior