Using Revit to do mechanical load calculations can be challenging. Part of this challenge is that many components required for load calculations have not been provided in most building models. Typically when a model is received by the mechanical engineer the building envelope looks complete, but lacks the material thermal properties. The thermal properties take a few minutes to enter when defining envelope components. Once defined in an assembly the assembly can be utilized in other models.
To assign thermal properties, in Revit, to wall materials do the following: Open the building model, typically the architectural model. Click on a wall, when the wall comes up in the property box, hit the Edit Type button located on the lower right corner of the component property description, see pic below. Now click on the structure Edit button. This will bring up the wall components (Fig.2), next click on the component material you are wanting to assign a thermal property to. In the upper right corner in the material box, there is another box with 3 dots in it, click the box. This brings up all of the material properties currently assigned to the wall. The tabs at the top of the properties are typically listed as “Identity”, “Graphics”, “Appearance”, and the “+” symbol (Fig. 1). Click on the “+” symbol. A drop down
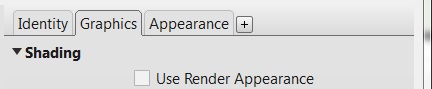
Fig. 1
with physical and thermal should appear, click on the thermal. A list of all the materials will come up, choose your material. The thermal properties for that material will be shown in the material browser screen. Hit apply at the bottom of the screen. Make sure the thickness is properly defined in the edit assembly window. The R-value for the wall can be seen above the layer box under resistance (Fig. 2).
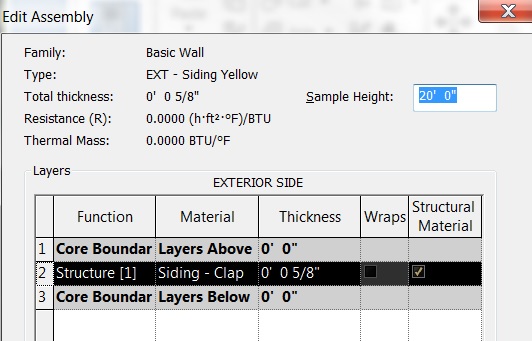
Fig. 2
You have now assigned a thermal property to a material. Continue assigning until the wall is assembled as it would in the field. Note if batt insulation is required do not create another layer for this, instead assign its thermal property to the stud wall material otherwise the wall thickness will increase to accommodate a layer of insulation in addition to the stud wall.
As the wall assemblies become better defined with their thermal properties, and walls are saved, projects using the same assemblies will not need to be defined. This will save both time and money down the line. Always remember if the R-value seems off it probably is, make sure the thickness of the material has been defined, and the material is correct.